Tuesday, April 29, 2014

Treasure Hunt

This was a fun toddler version of a scavenger hunt. I had some thick, multicolored yarn leftover from teaching that I used. You could use anything similar-rope, string, etc. I taped or attached the yarn to several different objects around the entire downstairs area in our house, making sure to send Rowin back and forth, in all different directions. I showed him where to start and told him to hold on to the yarn and follow it until he got all the way to the "treasure" at the end. At the very end, I had the yarn go around the corner (so he couldn't see it) and taped a bag of M&M's to the end. Your treasure doesn't have to be anything big or fancy-especially for little ones. He loved it, so I had him do it again in reverse and hid a new treasure at the other end. :) 
Ideally, you'd set the whole thing up without your child seeing, maybe during nap time. However, I set the whole thing up with Rowin watching me, but since he had no idea what I was doing, it really didn't make a difference!



Wednesday, April 16, 2014

Travel Pack

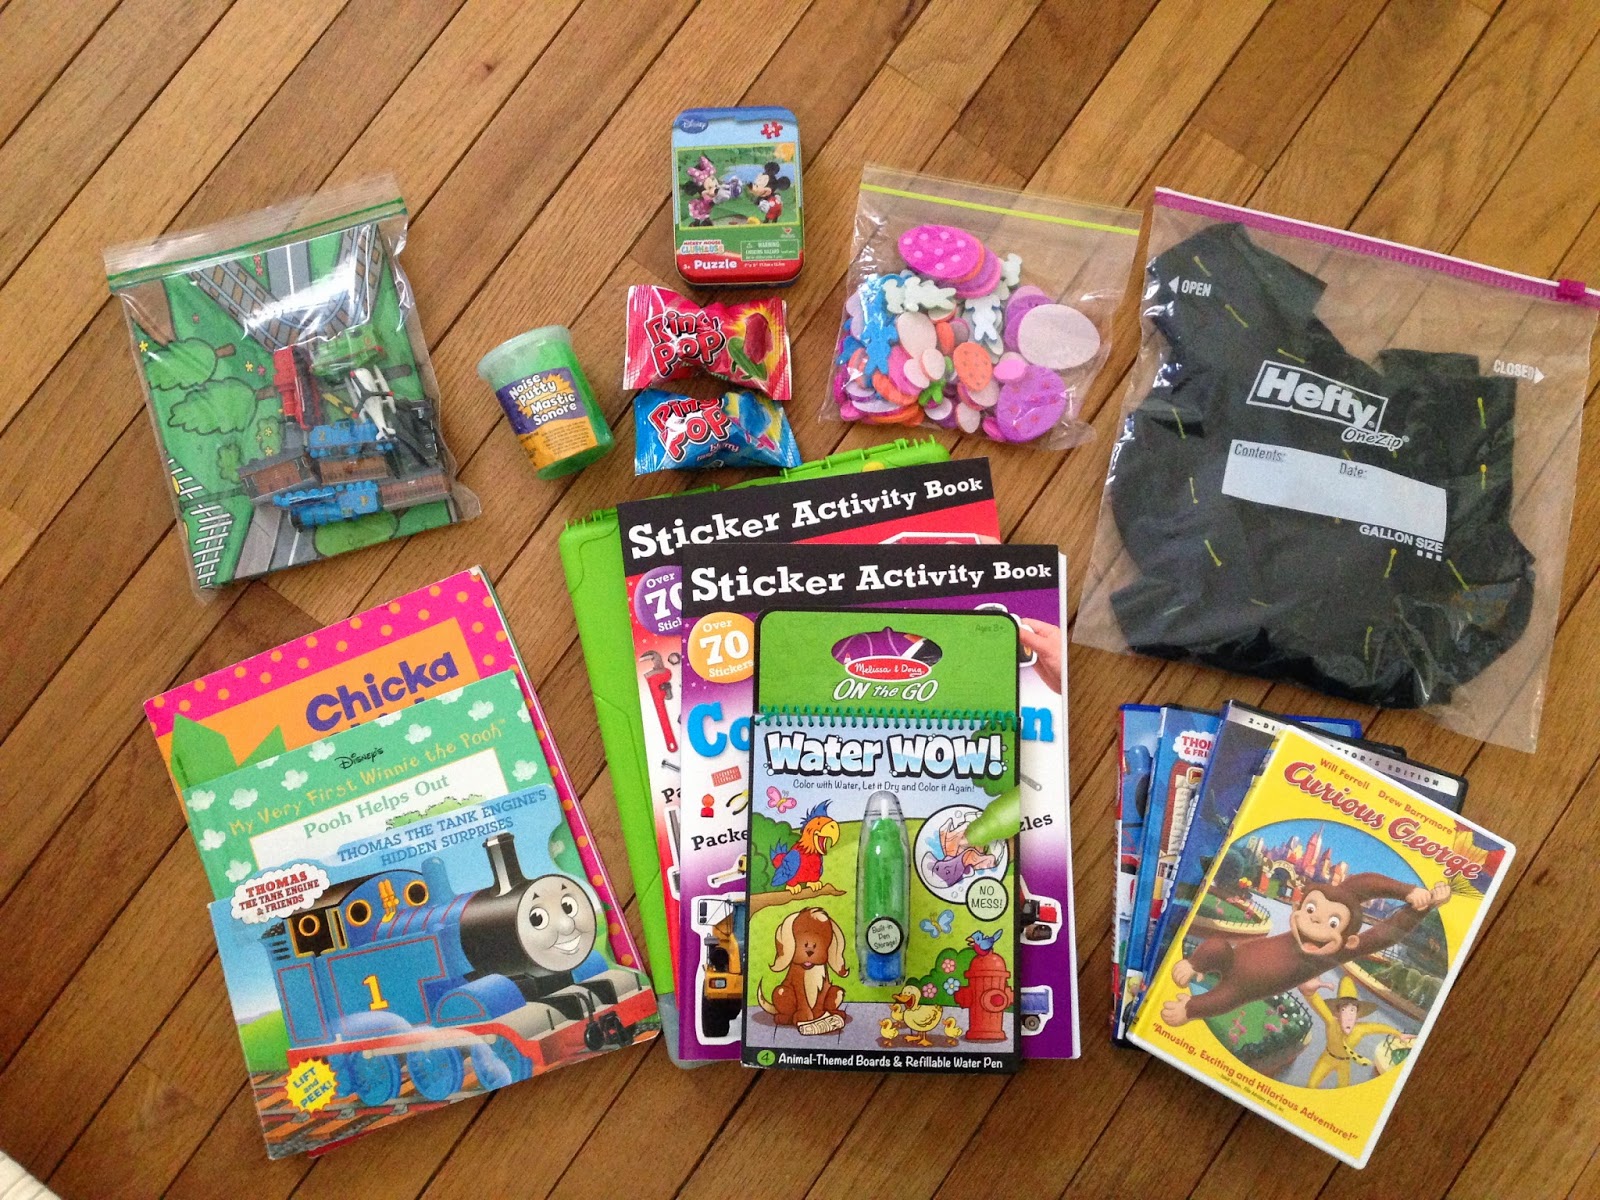
We are off to Florida in a couple days! YAAAYYYY!!! I am so excited! In an attempt to not completely overpack, I put together this smallish travel pack for Rowin. I wanted him to have enough things to keep him entertained on the flights and while we're there without having to pack an entire suitcase of toys.

Here's what I included:
  • The felt roads (from my last post) plus a few cars
  • A train play mat with mini Thomas and Friends trains (Barnes and Noble-$10)
  • Noise Putty-(Dollar Store-$1)
  • Mini 24-piece puzzle in metal tin-(Dollar Store-$1)
  • Ring Pops-because sometimes a sucker is entertainment in itself
  • Sticker Activity Books ($1 each at JoAnn's)
  • Water Wow-The "paintbrush" is filled with water. When you paint the pictures, colors magically appear with no mess. We love these! ($5 at JoAnn's or Learning Express)
  • Color Wonder-same idea, but it comes with markers that only show up on the special Color Wonder paper. God bless the people who created these things. 
  • Extra blank paper, markers, crayons, and lots of stickers
  • Some favorite books
  • Some favorite DVDs
  • Playaway (not pictured)-You can check these out at the library. It's like a little hand-held screen that comes with four episodes of a certain show (Elmo, SuperWhy, etc.)
Here are a few close ups so that you can see them better. 


Saturday, April 12, 2014

Felt Roads

I saw this idea somewhere a while back and have been meaning to make these. We are headed to Florida this week, so I thought these would be perfect to take with us!

All you need is black or gray felt or fleece and yellow fabric paint (I found a 3-pack at the Dolloar Store). Cut the roads into whatever size/shape that you want and then use the fabric paint to add the lines on the roads. Just make sure the ends are all about the same size so that they all line up evenly. 


Two things that I love about this: 1) You can create a new "track" every time you play, so it feels like a new activity for your child. 2) You can stick them all in a gallon sized ziploc bag, thow a car in there, and take them with you!


Tuesday, April 8, 2014

Orbeez!


Someone gave these to us a long time ago and we just found them when we were reorganizing our garage. They're kind of awesome.

They come as tiny little beads, the size of sesame seeds. You let them soak in water for a few hours and they turn into these tapioca-like balls. The box says ages 5 and up, but Rowin (2) loved them! So did his buddy, Taft, who just turned three. 


Rowin was pretty content just squishing them around with his fingers-makes a good little sensory activity!


It also came with these plastic trays so that you can make different designs.


If you want to make it an educational activity, you can make letters or numbers on the tray and have your child tell you which letter/number it is...OR...if your child has good fine motor skills and already knows all of the letters and numbers, you could have him or her form the letters/numbers on the tray. That would probably be closer to a 4-5 year old. 


Whether you just squish these around (which is kind of theraputic) or use these for practicing a skill, they are super fun! 

Wednesday, April 2, 2014

Coffee Filter Butterflies

These are a quick, cute little craft for spring time. You will need coffee filters, pipecleaners, and watercolor paints.

Have your child paint the coffee filter with the paint. Dot markers would work too-maybe even better? (Both bleed through though, so put something under the filter.)


The more color, the better. This is all I could get out of my two year old whose favorite color is black. Can you tell which one I made? :)

Once they're dry, pinch the middle into an accordian and then twist a pipecleaner around it to hold it in place. Curl the tips of the antennae and you're done! 


Haha, I was picturing these turning out a little more bright and cheery, but the only pipecleaners we had were gold ones leftover from Christmas and our wings were mostly white. Ha, oh well. Maybe we'll make more another day....or maybe we'll just keep our slightly depressing but still cute butterflies. :)

Sunday, March 30, 2014

Resurrection Eggs


With all of the candy and eggs and Easter bunnies that are around right now, we really want to teach our son what Easter is actually about. Don't get me wrong, we still do the eggs, candy, etc. but we're also trying to be intentional about teaching him about Jesus' death and resurrection. I've had a hard time trying to figure out how to explain such a serious and violent story to a two year old and then I found this idea on Pinterest (Here's the original link: http://womenlivingwell.org/2010/03/celebrating-jesus-with-your-kids-for/ 

With Easter only a few weeks away, I wanted to share this with you now so that you'd have enough time to make it. Apparantly you can buy these online or in some stores, but it was seriously SO easy to make!

Fill an egg carton with twelve plastic eggs and number them 1-12. I typed up the items that you put in each egg and the Bible verses that correspond.


 You could cut the verses into strips and put them inside each matching egg. I just folded the whole paper into thirds and stored it in the top.


You could start twelve days before Easter and open one egg every day or you could go through the entire story in one sitting. To be honest, I still may modify this with our two year old this year-maybe focusing less on the details like the nails, thorns, and spear and focusing more on the bigger picture-God's amazing love for us. Depending on the ages of your kiddos, this could be totally age appropriate or maybe something that you grow into. Either way, I hope it gives you a starting point for talking about Easter with your kids this year!

He is risen!!

Sunday, March 23, 2014

Make Some Music!

The other day, we scrounged around the house and found several items that we could use to make a few instruments. Rowin only stayed interested for about ten minutes. I think these might be better suited for little ones. Or maybe it's just him and your two year old will love them! :)

Guitar:

We used a griddle pan and stretched rubber bands around it for him to pluck. I tried using a jelly roll pan but didn't have any rubber bands big enough to fit around it. 


Shakers:

We had these little Elmo eggs from last Easter, but regular plastic eggs would be perfect too. We filled them with some dry pasta and then closed them back up to make shakers. You could fill them with rice, beans, whatever you have in your pantry or junk drawer!


Drums:

To make our drums, we just used an empty coffee tin and some popsicle sticks!


 Do you have any other fun and easy instruments that your child likes to play with?? Please share!